
-
Postów
67 -
Dołączył
-
Ostatnia wizyta
Typ zawartości
Forums
Gallery
Blogs
Treść opublikowana przez BarryBio
-

HPS 1000W | Canalope Haze
BarryBio odpowiedział(a) na BarryBio topic w Zakończone Fotorelacje Indoor
Aj... oklasków nie potrzebuje. Specjalne sprostowanie dla Ciebie: jestem kolegą Barrego, widziałem te planty na oczy jak też je paliłem. Za prośbą Barrego prowadzę jego konto na tym forum, on nie zna polskiego jedynie tyle co załapał z naszych rozmów Niestety na bieżąco nie da rady prowadzić growlogów, jak ja i sam pod innym nickiem nie jestem w stanie swoich wrzucać więc niestety jedynie tak możemy pokazać co u nas rośnie... tak czy inaczej, dzięki za komentarz- 16 odpowiedzi
-
- canalope haze
- 1000w
-
(i 7 więcej)
Oznaczone tagami:
-

HPS 1000W | Canalope Haze
BarryBio odpowiedział(a) na BarryBio topic w Zakończone Fotorelacje Indoor
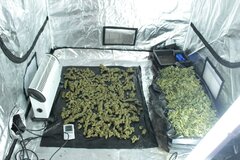
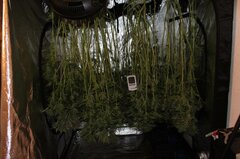
Hey Guys, The Last update for the lady's go up in smoke. I was pretty pleased with the harvest, although there is much room for improvement. Such as a better night temp, in the beginning I did not have a heater yet. The wood i put under the tent was not good enough to keep the roots warm enough, some plants where not perfect finished due to that. And I flipped the light to late which resulted in way to big plants, I did bend them multiple time. but still some were too close to the light. But still most off the time the light was running on 500 Watt, and I got a yield of 430 gram I already smoked 10 grams, so the 420 Grams I am going to proper cure this, for 1,5 months. After the plants have dried like 10 days i started to trim them totally clean. But I noticed that the buds where still a bit moist so I spread the buts on a piece of plastic and let it dry for 1/2 days longer with a small heater on the side. And on the side I was drying al leave mat. to make Isolator hash from later on Closer Closest This was the report of this tent. On the side I had another project running, and made photo's throughout the whole cycle as well. Will post this one soon Thanks for watching stay tuned for even better results. working hard on it!! Keep on Growing! I to by było na tyle. Dziękuje za oglądanie Za jakiś czas następne moje growlogi- 16 odpowiedzi
-
- 1
-

-
- canalope haze
- 1000w
-
(i 7 więcej)
Oznaczone tagami:
-

HPS 1000W | Canalope Haze
BarryBio odpowiedział(a) na BarryBio topic w Zakończone Fotorelacje Indoor
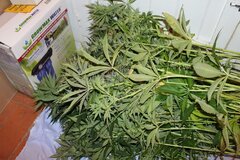
Hey Guys, Our journey With the Cannalope Haze is almost done, and it was a fun one, still not a perfect one but yeah some more practice will do the thing. Loads off room for improvement: next run I will try to keep the pot temp higher by putting the complete tent on Styrofoam plate (insulation). This run had some cold problems in the night, going to prevent this the next time. And the biggest thorn in my eye: was that I flipped the light to late and therefore the plants grew to close to the light After 8,5 weeks i decided to Chop the lady's down, some look like they could use a few more days, but most of the lady's have nice brown pistils, I also saw some buds that started to produce 'banana 'thingy's means the lady's are trying to sex change and it is a matter of time and these bananas will produce pollen that will pollinate all the buds and then you will have seed in there:(. Here you can see good that the ones in the middle got a bit sun burned The other side of the tent Some more buds I was happy to see big fat Stems Here you can see the amazing grow force of the plant Big pile of lovely plants Empty tent Full tent Some hanging around pics Yes guys I am really stoked just a week to hang dry and then the trimming will start Make a nice update of that as well. Really want to know how big the yield will be Keep on Growing!- 16 odpowiedzi
-
- 1
-

-
- canalope haze
- 1000w
-
(i 7 więcej)
Oznaczone tagami:
-

HPS 1000W | Canalope Haze
BarryBio odpowiedział(a) na BarryBio topic w Zakończone Fotorelacje Indoor
Hey Guys! It has been a while, but the lady's are doing pretty wel and me 2 Only some got a bit burned But thats oke. Next time flip the lady's sooner to 12 hours. And got some cold issues, have some room for improvement the next round But still I am pretty pleased with the results We have entered the 8 week of flowering, so she should be ready to harvest. But I am going to let here stand strong one more week. Much of the pistils are still pretty white, so that one week more to get the pistils/trhicomes nice and brown. The ladys to close to the middle got a bit burned Sweet fat bud Here you can see the pistels are still pretty white... so be patience Light just put on. Another couple off buds.. This is it for now, next week sweet harvest week Will keep you updated. Green greetings!- 16 odpowiedzi
-
- 1
-

-
- canalope haze
- 1000w
-
(i 7 więcej)
Oznaczone tagami:
-

HPS 1000W | Canalope Haze
BarryBio odpowiedział(a) na BarryBio topic w Zakończone Fotorelacje Indoor
Hey Guys, Hope you al are doing well Most of my lady's are We are now in the 6 week of flowering and some of the bud are getting pretty nice and fat. The stickynes is on whole new level aswel already. I have been continuing with feeding the plants with Compost Tee every week. Unfortuanaly the are some sun burned buds, bat there are many good ones to make up for it. Note to myself; next time hazy variety flip/switch the light to 12 hours faster than your feeling says Here you can see some sun burned leaves Lucky enough to make up for, leaves geting a bit yellow, but don't panic it is organic The compost tee will fatten those ladys up more any way This baby has no yellow leaves at al. Yellow leaves towards the end is completely natural, the plant feels like it is autum. To have dark green plants untill the end of the harvest, it won't have finished her natural course yet. From now on it is only a matter of fatten those ladys up. Will keep you updated with the proces That is it for now, Have a good smoke you all!- 16 odpowiedzi
-
- 1
-

-
- canalope haze
- 1000w
-
(i 7 więcej)
Oznaczone tagami:
-

HPS 1000W | Canalope Haze
BarryBio odpowiedział(a) na BarryBio topic w Zakończone Fotorelacje Indoor
Hey Guys! Hope you all had a happy new year! And lets make 2017 a grownig huge year. The plants are doing pretty fine, altough they are a bit stretched but thats oke far a hazey varietie. We are now deep in the 3 week of flowering, and the 'work' is going to start. But at least it is fun work. And by work I mean we are going to water the ladys with Compost tea. I use a premix compost tea : Pk booster compost tea made: Biotabs What is PK Booster Compost Tee? It is a really interesting mix of 5 components: Bat Shit (Guano) Grapes (compost) Bug Shit (meal worms) Seaweed (kelp) Add extra: Orgatrex (molasse) With these 2 products you are ready to brew your own compost tea What the secret is about orgainc growing is trying to add as much as possible beneficial bacteria's and micro organisms. In the beginning of the grow we did this with the Startrex, Mycotrex, Guano. So to give the flowering time a extra boost of beneficial bacteria's and micro organisms we add the compost Tee. We begin with deciding how mcuh water we are goin to give the plant. We have 12 plants and we are going to water them 1 liter of compost tea. So I need a bucket that can contain 12 liter of water. Per liter of water 15 grams/ 1 eating spoon of Compost 'powder' And also as extra feeding for the bacteria add 5 ML per liter of water Orgatrex And to make sure the bacteria's and micro organisms multiply faster we are going to let an air pump hang in there Let It bubble for 24-36 Hours And then the Organic Compost Tee is ready to feed my ladys. And fatten those Bitches up (don't know if you should use that) So what happens in the bucket: in the 15 grams of compost are hundreds of different kind of beneficial bacteria's and micro organisms, as soon as they are in the water they will start multiplying, that comes together with a feeding frenzy off bacteria's eating each other and shitting each other out. And those pieces off shit, that is the shit you want for your plants. I am going to repeat this proces every week. Because I am using Autopots I always turn of my water system 2 days before I start watering with the PK booster, to make sure the plants suck it al up (compost tee). And the Autopot resevoir not spill any water. Starting to get there... Quite a Bush... Al little overview. In the coming week I will start to hang the plant on the yo-yo's To get them al straight. This is it for now. update soon- 16 odpowiedzi
-
- 1
-

-
- canalope haze
- 1000w
-
(i 7 więcej)
Oznaczone tagami:
-

HPS 1000W | Canalope Haze
BarryBio odpowiedział(a) na BarryBio topic w Zakończone Fotorelacje Indoor
Hey Guys a little update before the end of the new year. I am pretty stoked! This time I made some photo's with the light off, so you can really see how green and happy the plants are. The plants are now entering the 3 week off flowering and they have become very big! You can also see the beginning of the new born buds. Maby a bit to big for my likings in the 'small' 2.00 meter high tent If they will stretch some more I will have some sun burned buds for sure But what I do against that: just pinch bend the head stems down and try to get them at a equal height as the other plants are. Some times the stem stays nice in its place. Sometimes the head stem is in the same positition after 1,5 days The ideal distance between the Gavita light and the canopy is about 90 CM, currently that plants are at 75 Cm, so that is a bit to close. Lucky I have added some Lava meal to my soil, and that contains high levels of silicium and that should make the plant stronger, able to withstand higher temperatures, let hope it works! In the background you can see 2 main branches that are bend down to prevent sun burns. The plants went so big that down below on the plant the branches and stems don't get much light, so it is better to terminate al the small shitty things(branches and stems) because they will only give you more work and not a higher yield. Also the quality of those shadow hidden buds is really low. And as a proper Organic grower we only want the best All lower shitty stuff terminated. F.Y.I the plants only have had tap water until now So very 'easy' going until now So next week the 'working' will start. If you can call it that. I will be brewing my own Compost tea, to give the soil life an extra boost to make sure we get the biggest/ smelliest buds as possible. It is a real fun thing to do, but you will see in the next update Overview of the garden Much stems and future buds in the making This is it for now hope all you guys had a merry Christmas! And that we all have a Happy new year filled with loads of big organic nugs!- 16 odpowiedzi
-
- 1
-

-
- canalope haze
- 1000w
-
(i 7 więcej)
Oznaczone tagami:
-

HPS 1000W | Canalope Haze
BarryBio odpowiedział(a) na BarryBio topic w Zakończone Fotorelacje Indoor
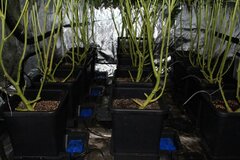
Hey Guys It has been a while, but I am very pleased to show you the update. The last update the plant were 3,5 weeks old and on 18/24 hour light. Here a little overview of the garden We are 3 weeks further now, and in the Grow period I continued with treating the plants with Boom Boom spray. What I also did: hang up some cable to attache the yoyo's because hopefully the buds will get so fat that they will need some suport. Due to the cold nights I had to install a heater as well, first I had the heat hooked up to a time switch. But there was some overlap off the heater and the light on at the same time. then I adjust the time again, and there was a brief time that the heater and the light were of at the same time So I went to the grow Shop to ask for a solution, and they gave me this little black box controller This box makes sure the heater will go on when the light go ou What I also did: the longer plants that had a big stem sticking out of the canopy I pinched bend them down to try to create a equal high canopy . So every stem gets the same amount of light. As you can see on the Pic the Plants have just exploded, The soil life is getting up to speed! They are all very green and super thick stems, super healthy. This promise the be a very good harvest. Here a example of the pinched bend down plants A couple of days ago I set the light on 12/24 hour light, So now the countdown can begin Got a load of mega fan leaves, in a week or so I am going to remove these for better light penetration. But it is a v ery healthy sign Here is a a other photo where you can see the Autopot system in action and some of the bended plants. Somewhere next week I will start with removing the lower branches and leaves, to let the plant concentrate fully on getting the main buds nice, smelly and thick. But in the next update you will see what I am talking about. This is it for now.- 16 odpowiedzi
-
- 1
-

-
- canalope haze
- 1000w
-
(i 7 więcej)
Oznaczone tagami:
-
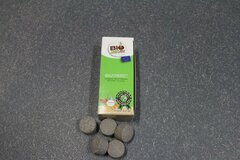
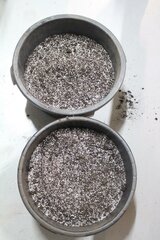
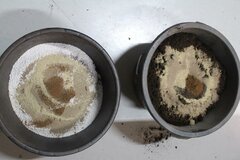
Witam, wkrótce przetłumaczę cały tekst, puki co dla tych co znają angielski Grow report Cannalopehaze/Biotabs Fertilizer Hello everybody my name is Barry Bio. I have been growing organic for some time now. It is so much fun to do I recommend it to every one! And I would like to share my recently started, little grow. Lately been having such nice organic results, that I just had to make a grow report. Also making records of your grow, makes it even more fun to do and you actually know what you did last time, so you won't screw it up next time. It is even more fun when you have a set up, that needs little maintenance. Off course for a kick ass grow to succeed you need a proper set up. So what I learned in the past don't be close fisted when it comes to buy equipment, it will pay for its self you just have to be patient. As is with growing So what I did in this room: First I made a wooden construction around the window, to make sure no light will escape when you are opening/ working in the tent. And I made hole to connect the tube that is extracting the smelly air. Also to make sure that the air you just filtered, not goes back in to the room and gets filtered again or else eventually this will lead to smelly situations, I found that out the hard way, with police knocking on my door. It takes a bit of time to set up, but in the long run, it takes away a lot of worries. Then I cut pieces of wood to put the tent on, so the tent will not be directly on the floor. And the pots not will be cold. When you are growing organic with lots of care, you want to be sure that your soil life is not catching any cold. Because microorganism and bacteria don't thrive in cold conditions. Set up: Tent: Darkbox 1.50x.150.2.00 Filter: Canfilter Extractor: MDF box 500 M3 Air: SMS controller Light: Gavita 1000 Watt E-serie+ El2 Master Controller (handy little computer) Watering: Autopot System + airdome Fertilizer: Biotabs Organic fertilizers Setting up: When this al was done I could start setting up the tent luckily that's quickly done. Afterward hang up the Filter connect it to the MDF box that is connected to the hole made in the wooden frame. Connect the MDF box to the SMS controller and you are ready to set the temp to your likings. Then it is time to hang up the light easy peesy. The people at Gavita made sure the master controller is idiot proof, so it is very easy to install. Just plug and play. Setting up the autopot is a pretty easy job as well, this will be the first time I will use the autopot system together with the Airedome, That is a little blue dome shaped piece of plastic that will feed air to the roots, Roots thrive when they are fed with air. So I thought let's give it a try; BIG ROOTS BIG FRUITS! Biotabs. Why the Biotabs is such a good organic product: It is copying mother nature in a pot, and who knows better than Mother nature? Biotabs is an organic fertilizer that uses bacteria and microorganisms that work together with the plant. A symbiosis has started between: plant, roots, bacteria and micro-organisms. All working together to make sure you get the fattest/ smelliest/ healthy plants. Setting up the Biotabs, is a easy and fun thing to do. We start with 50 Liter of Bio soil(al soils will work) then we add 50 liter of Perlite as well to make the soil more airy (roots love it!) This makes a total of 100 liter Soil-Perlite mix. This enough to fill 7,5 pots of 15 liter. Then we add the Startex 200 Gram mix it through the soil The Startrex is a really concentrated compost that contains high levels of humus/ bacteria's. With this product you will bring your soil to live. And it is a fine powder that is quickly available for the plant, that means that it is directly working for your plant. And makes sure that other bacteria are available for the plant that normally would stay in the ground unused. The bacteria convert organic material in to nutrients. Then we add the Mycotrex 50 grams mix it with the soil The Mycotrex is a very interesting product that not much companies are selling. The mycotrex exist out of a blend of 9 different mycorrhiza spores specially selected for the growing off our beloved plant. The Mycotrex is a kind off root stimulator, but not your ordinary root stimulator! It works with spores quite similar as the ones we know from the Champion mushroom. Only these spores live under ground, and when they germinate, they will start growing, feeding themselves with dead organic materials in the soil, When they grow the will search for roots, when the mycorrhiza spores have found the root they will attached to each other. And the mycorrhiza will pass nutrients to the roots as well and keep on growing. So then you have got a double root system going on: A root system of the normal roots and a system of the mycorrhiza fungi. Again: BIG ROOTS BIG FRUITS! As organic grower I like to add more organic materials, I also add 200 gram of me insect meal as a fast available fertilizer. And I also add 100 grams of Bat Guano for better taste of the buds. Then you soil looks like this: Give it a good mix, and you are ready to fill the pots. Fill the pots, and in the plant hole add a bit of extra Mycotrex. Put in the plant, and next to it push in the Biotabs The Biotabs is made off only organic material such as Stone meal, bone meal, blood powder and many more things. When the tab is in the soil, every time you water you plants the tab will dilute slowly giving nutrients to the whole soil life. Throughout the whole grow. Just one time a water solution of Orgatrex and Bactrex Orgatrex is a sort of sugar molasses that feeds the soil life. The Bactrex is a powder that is filled with trichoderma fungi and soil bacteria, The fungi protect the roots from diseases. The bacteria convert organic material in to nutrients. And BAM!! You have got a sweet garden Filled with CannalopeHaze: In this Photo the plant are 3,5 week old in total. They have been in the 15 Liter pot for 1 week now. and I left the light on 24/24 and the temp on a nice 26.6, Due to the master controller it stays that way. And I am going to start to bend them down co create more main Cola's. And I have topped the plant. And I am going to spray them with Boom Boom Spray This is a spray filled with Amino acids and nitrogen, to make sure you plant stay healthy and green. Your plant will experience an explosive grow every time you use it. Here are the plants Sprayed with Boom Boom Spray. And I am going to start putting the light on 18/24 hours. So I am going to need a heater for the cold nights. Hope you like it so far. This is it for now, soon I will post an update with how the Lady's are doing. Keep on Growing!
- 16 odpowiedzi
-
- 1
-

-
- canalope haze
- 1000w
-
(i 7 więcej)
Oznaczone tagami:
-


